Running a Trading Bot with Hummingbot on Derive

Welcome to the new Derive Hummingbot Connector Guide, your comprehensive resource for integrating and trading on Derive’s decentralized derivatives platform using Hummingbot. Powered by the innovative Derive Chain and built on the OP Stack for high throughput and low-cost settlements, Derive redefines onchain trading with seamless onboarding, robust self-custody, and advanced risk management for options, perpetuals, and structured products.
In this guide, we'll walk you through connecting your Derive account to Hummingbot and setting up an automated trading bot to harness these cutting-edge features. Let's dive in!
Add Funds and Get Derive API Keys
Before you can start trading on Derive using Hummingbot, you'll need to set up your wallet, connect it to the Derive platform, deposit funds, and configure your API access. This section walks you through these essential first steps to prepare your account for automated trading.
These steps match the Derive exchange connector docs. Derive supports wallets such as MetaMask, Rabby, Coinbase Wallet, and Ledger. This guide uses MetaMask as the example.
Install MetaMask
If you haven’t already, download and install the MetaMask browser extension or mobile app. Create a new wallet or import an existing one.
Connect Wallet to Derive
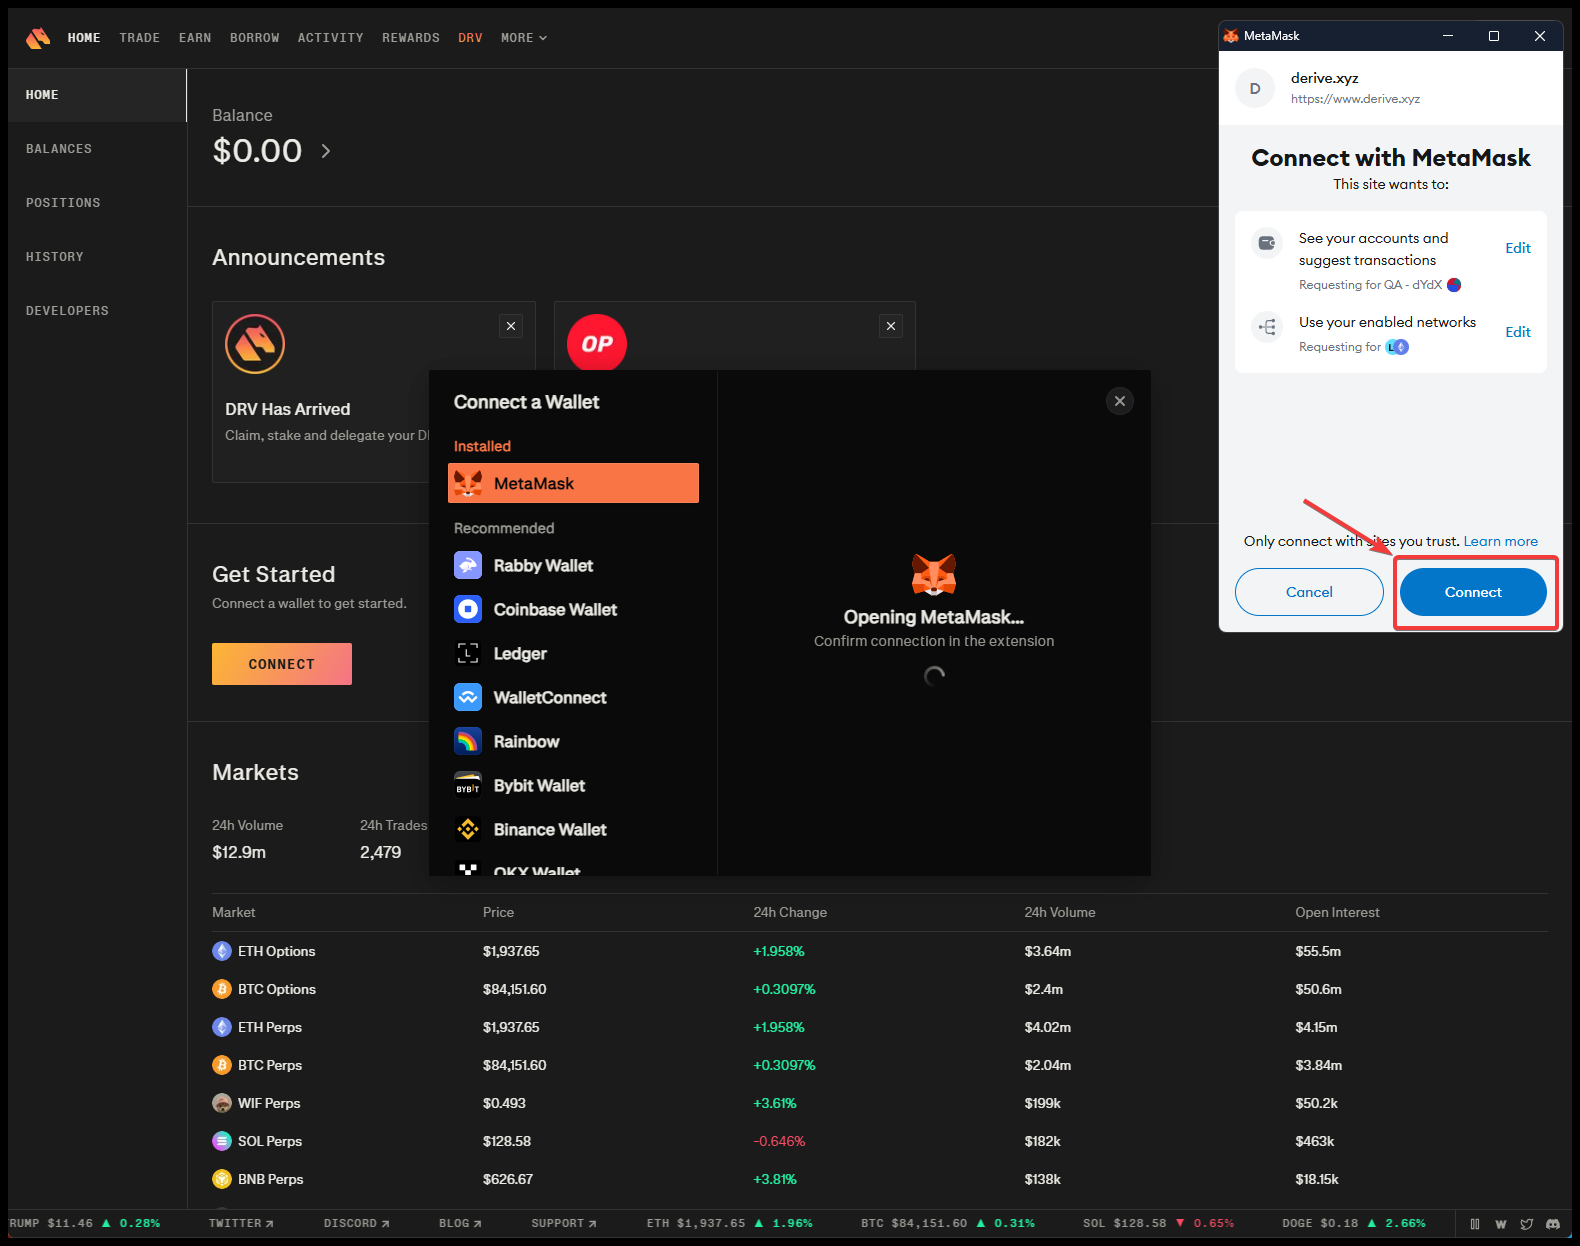
Open https://www.derive.xyz (or https://app.derive.xyz/). Click Connect at the upper right side of the page.

- In the wallet picker, select the wallet you want to use (for example, MetaMask)

- Approve the connection in your wallet. Your wallet extension or app will open a pop-up asking you to connect this site — click Connect or Approve
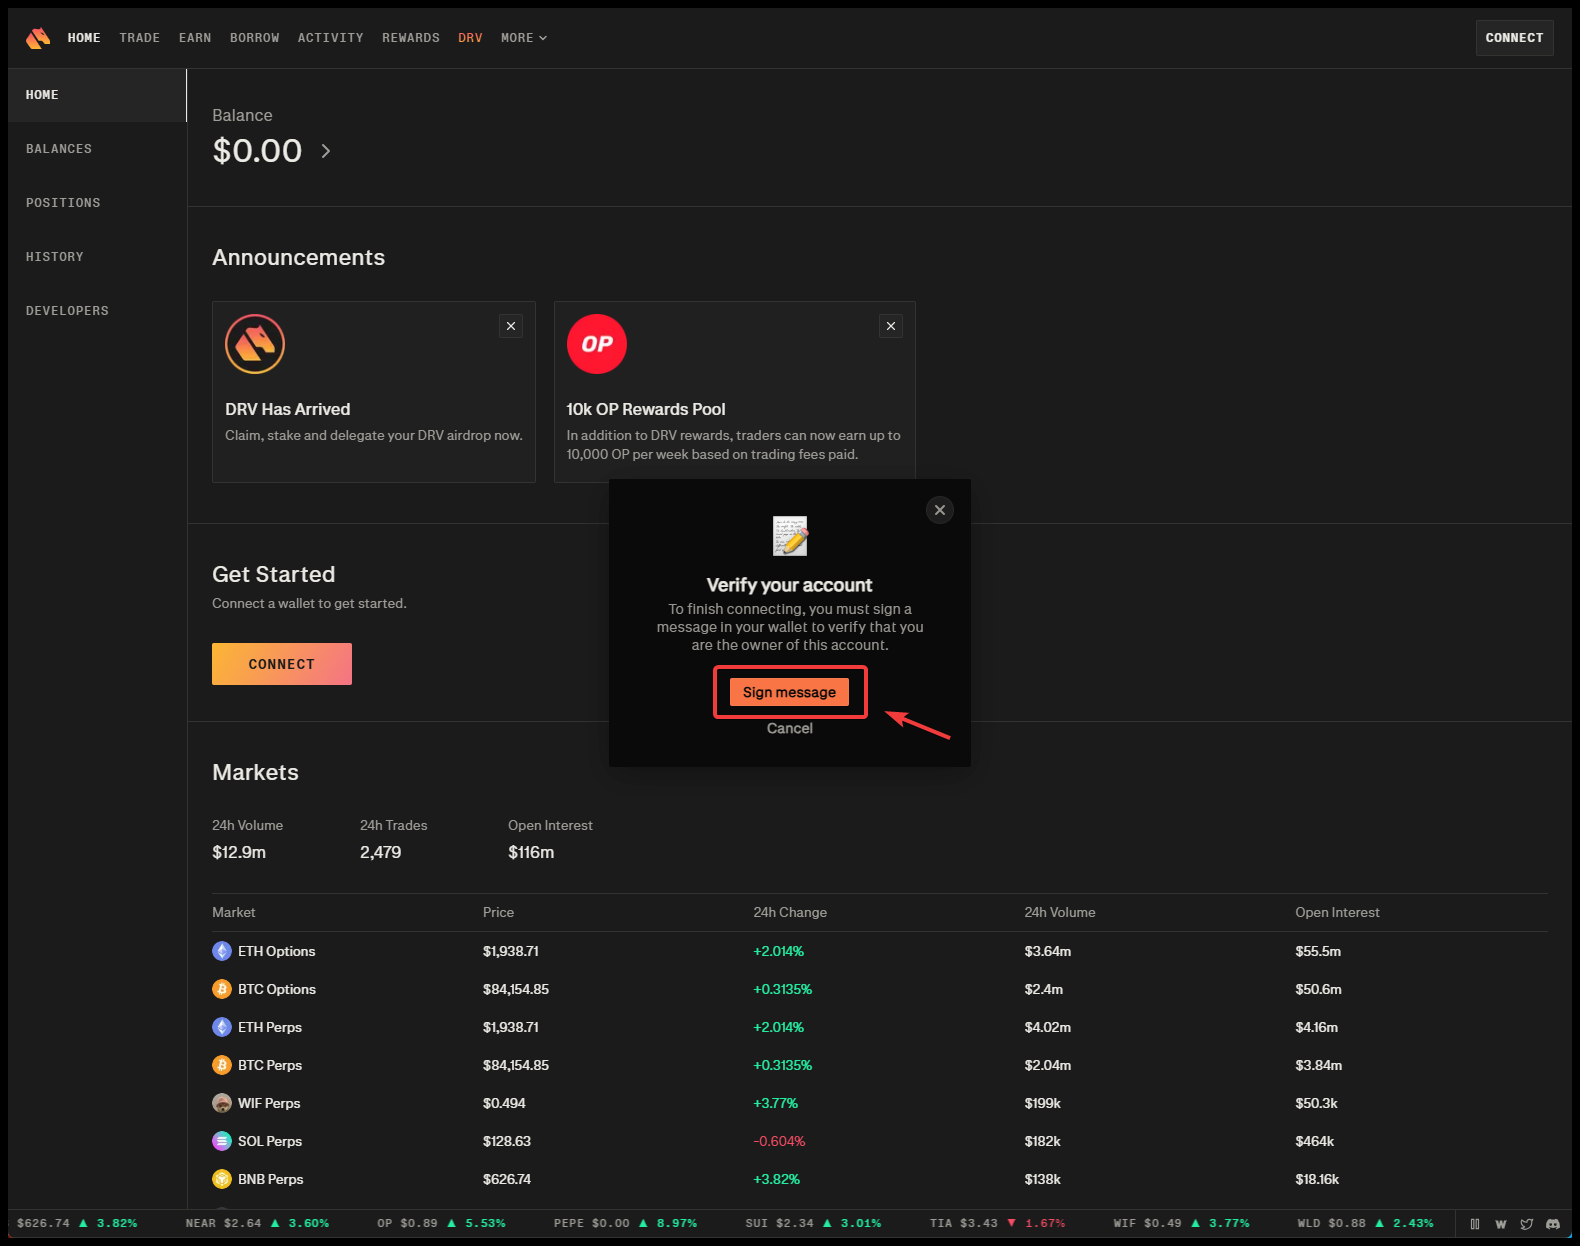
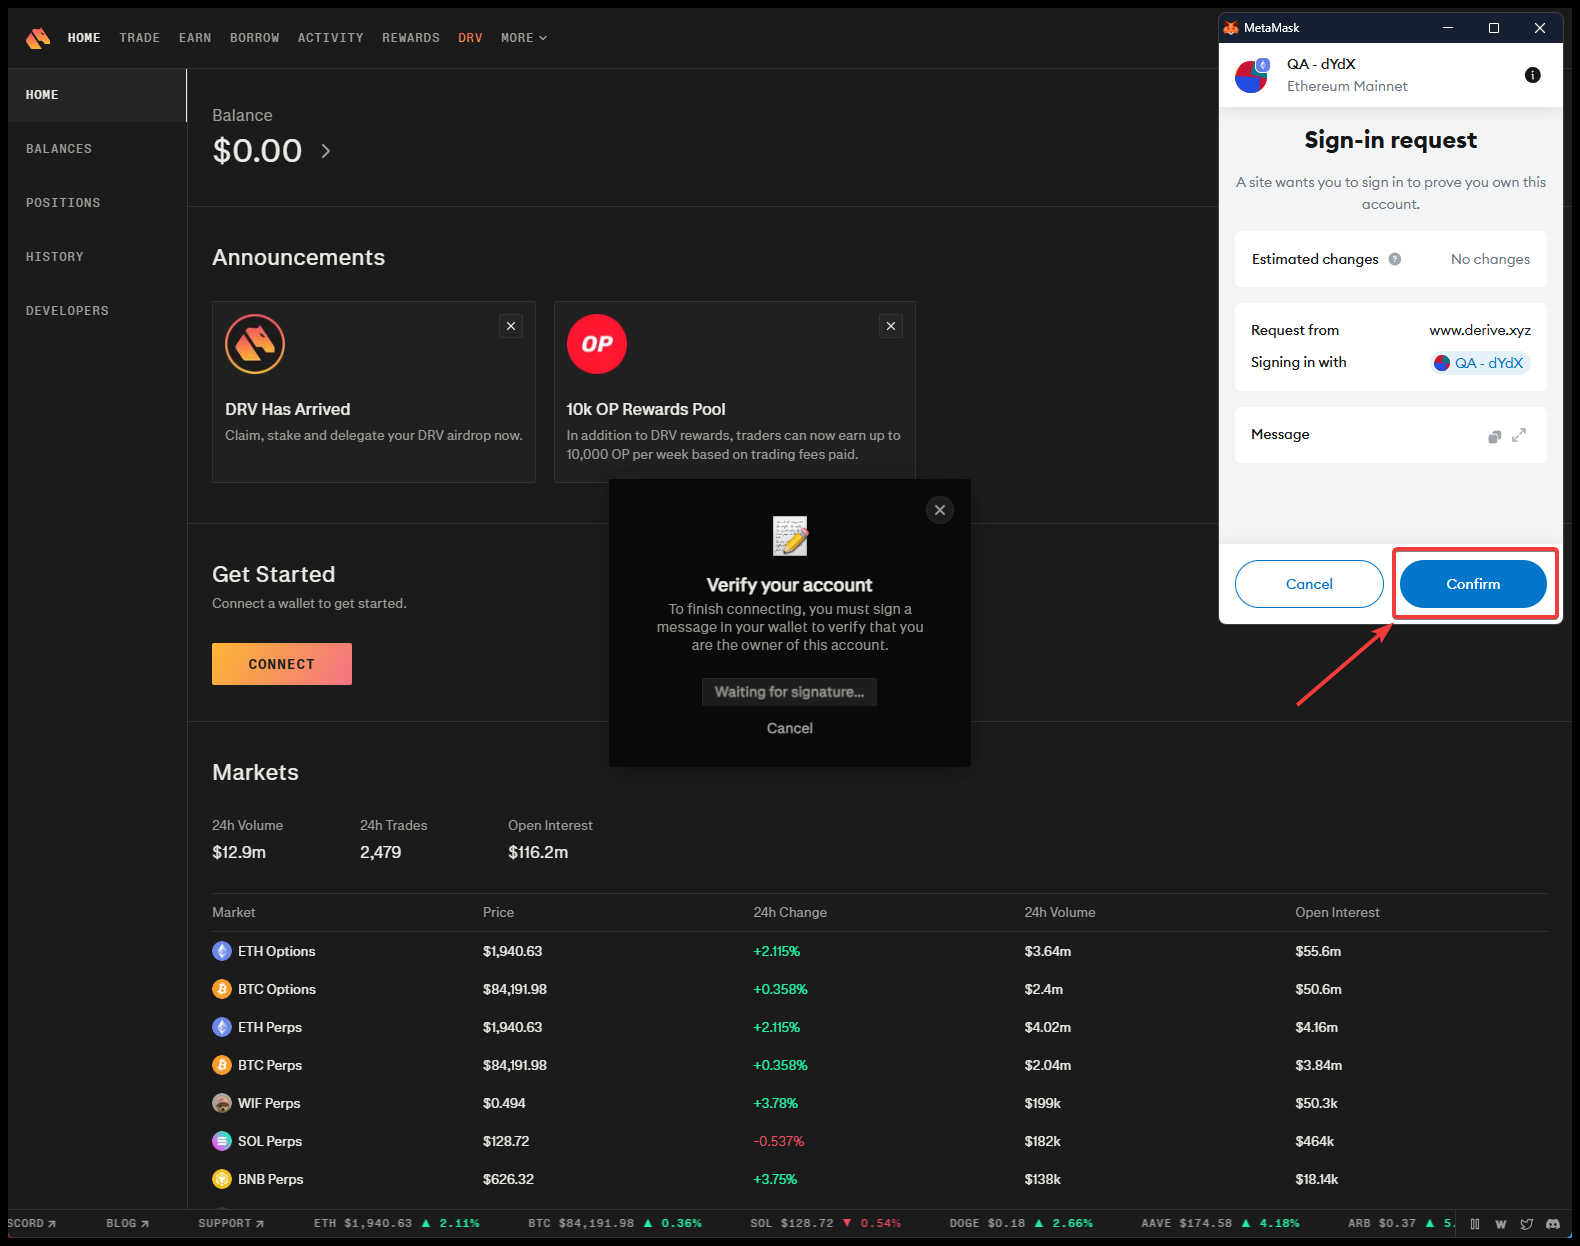
- Sign the message Derive sends to verify you own the wallet
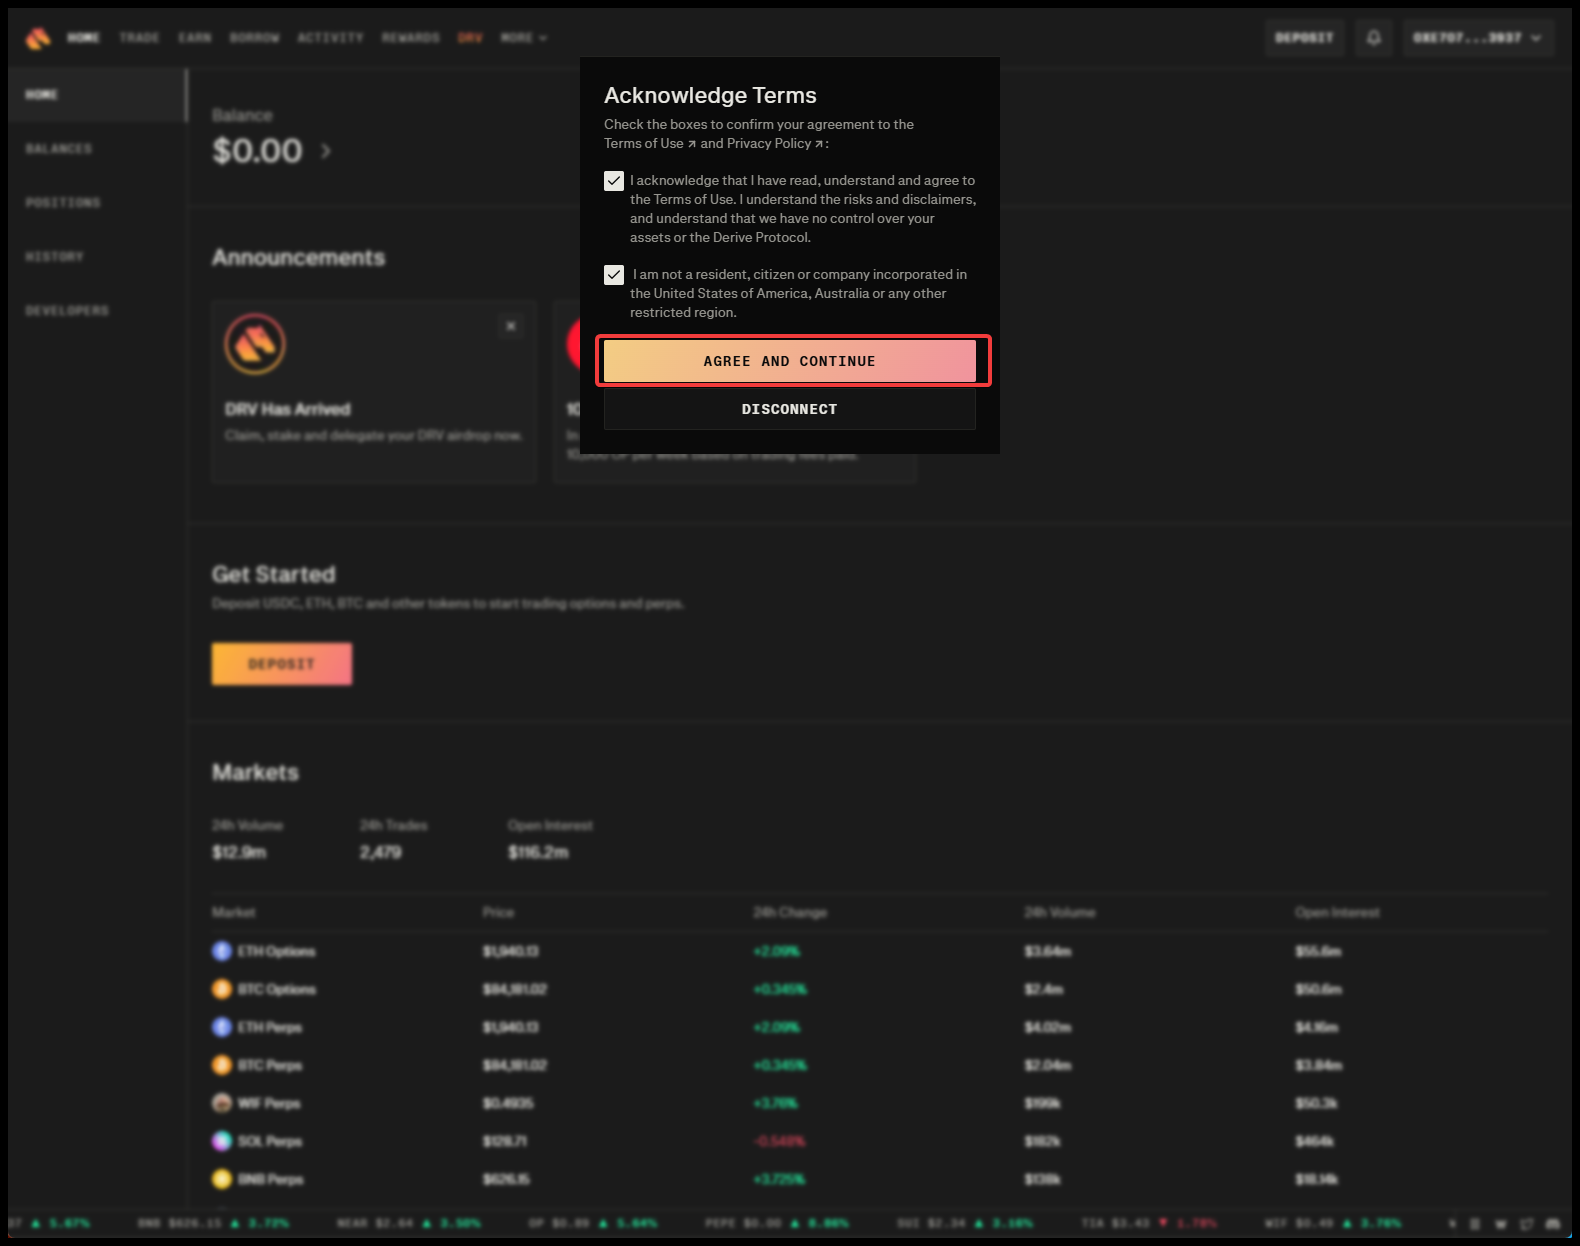
- If prompted, review the terms, check the agreement boxes, and click Agree and Continue
Your wallet address should now appear in the top-right corner.
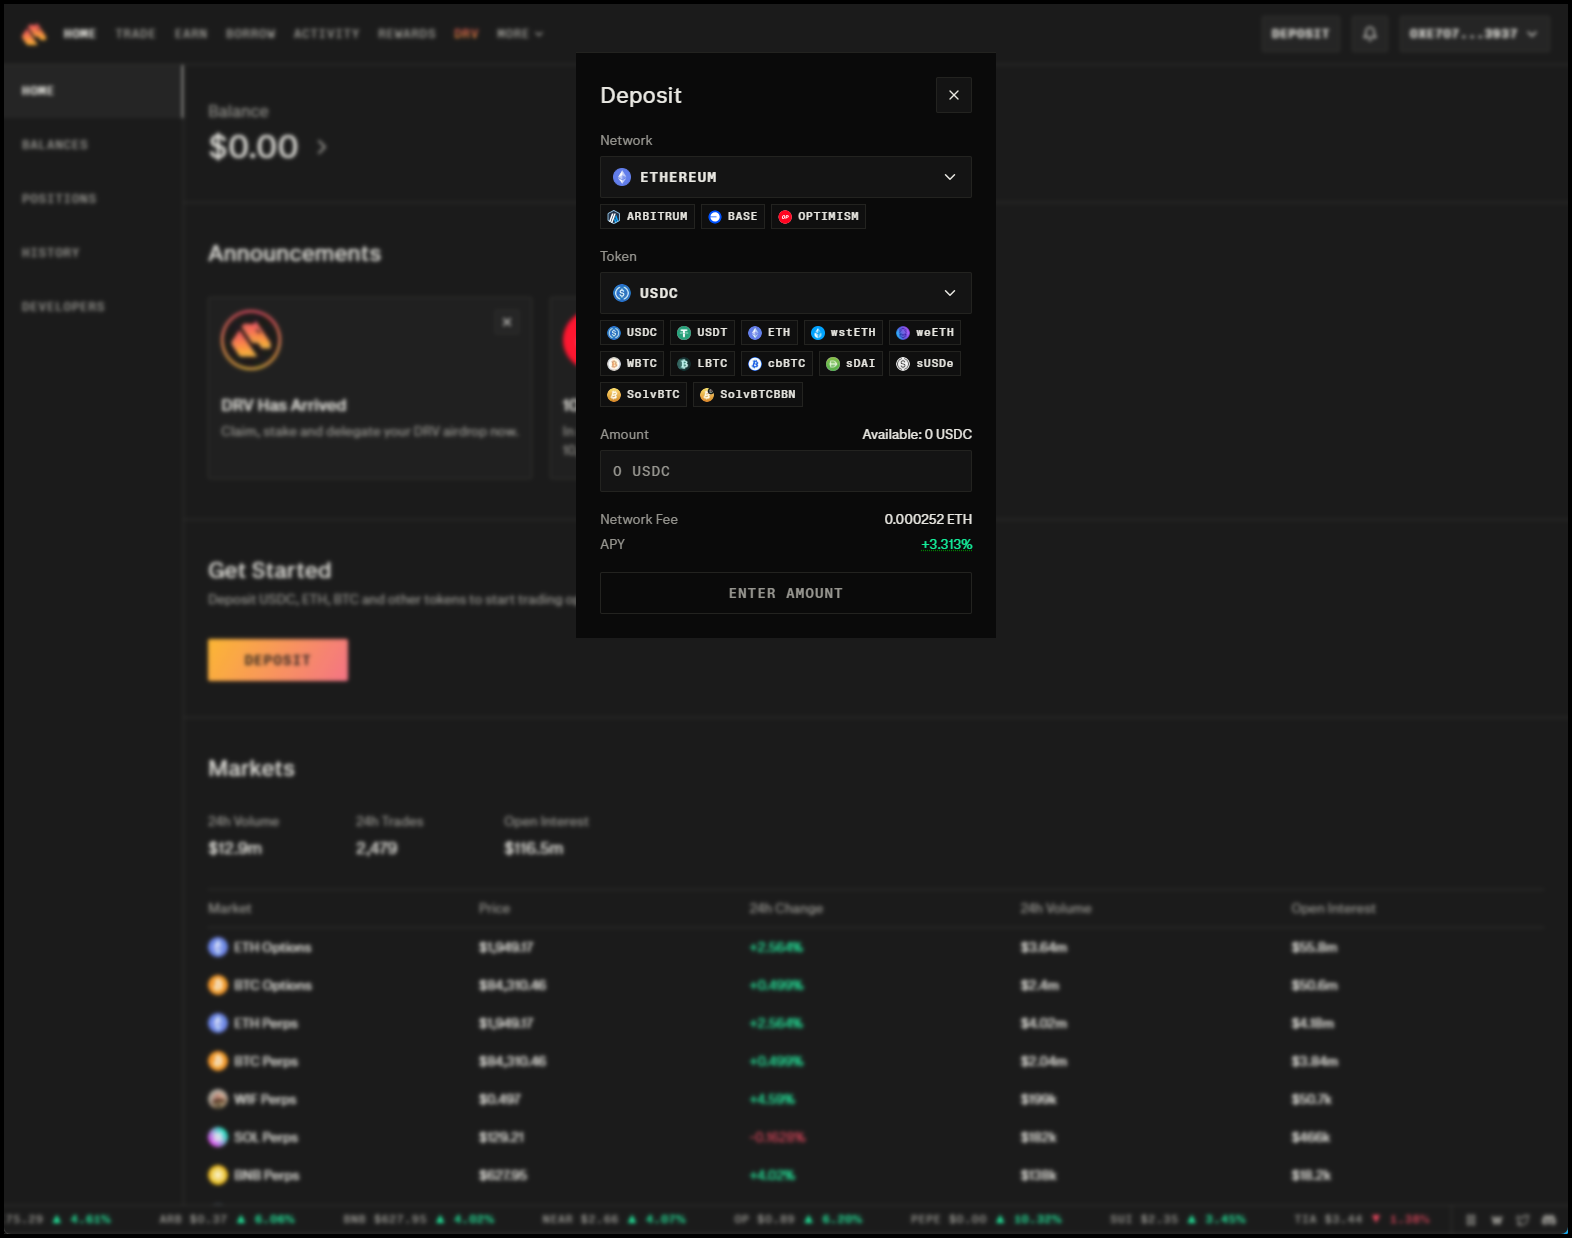
Deposit Funds
Once your wallet is connected, deposit tokens into your Derive account. Deposit USDC, ETH, BTC, and other tokens to start trading options and perps. Make sure you have enough balance to cover at least the minimum trading amount plus fees.
Register Session Key
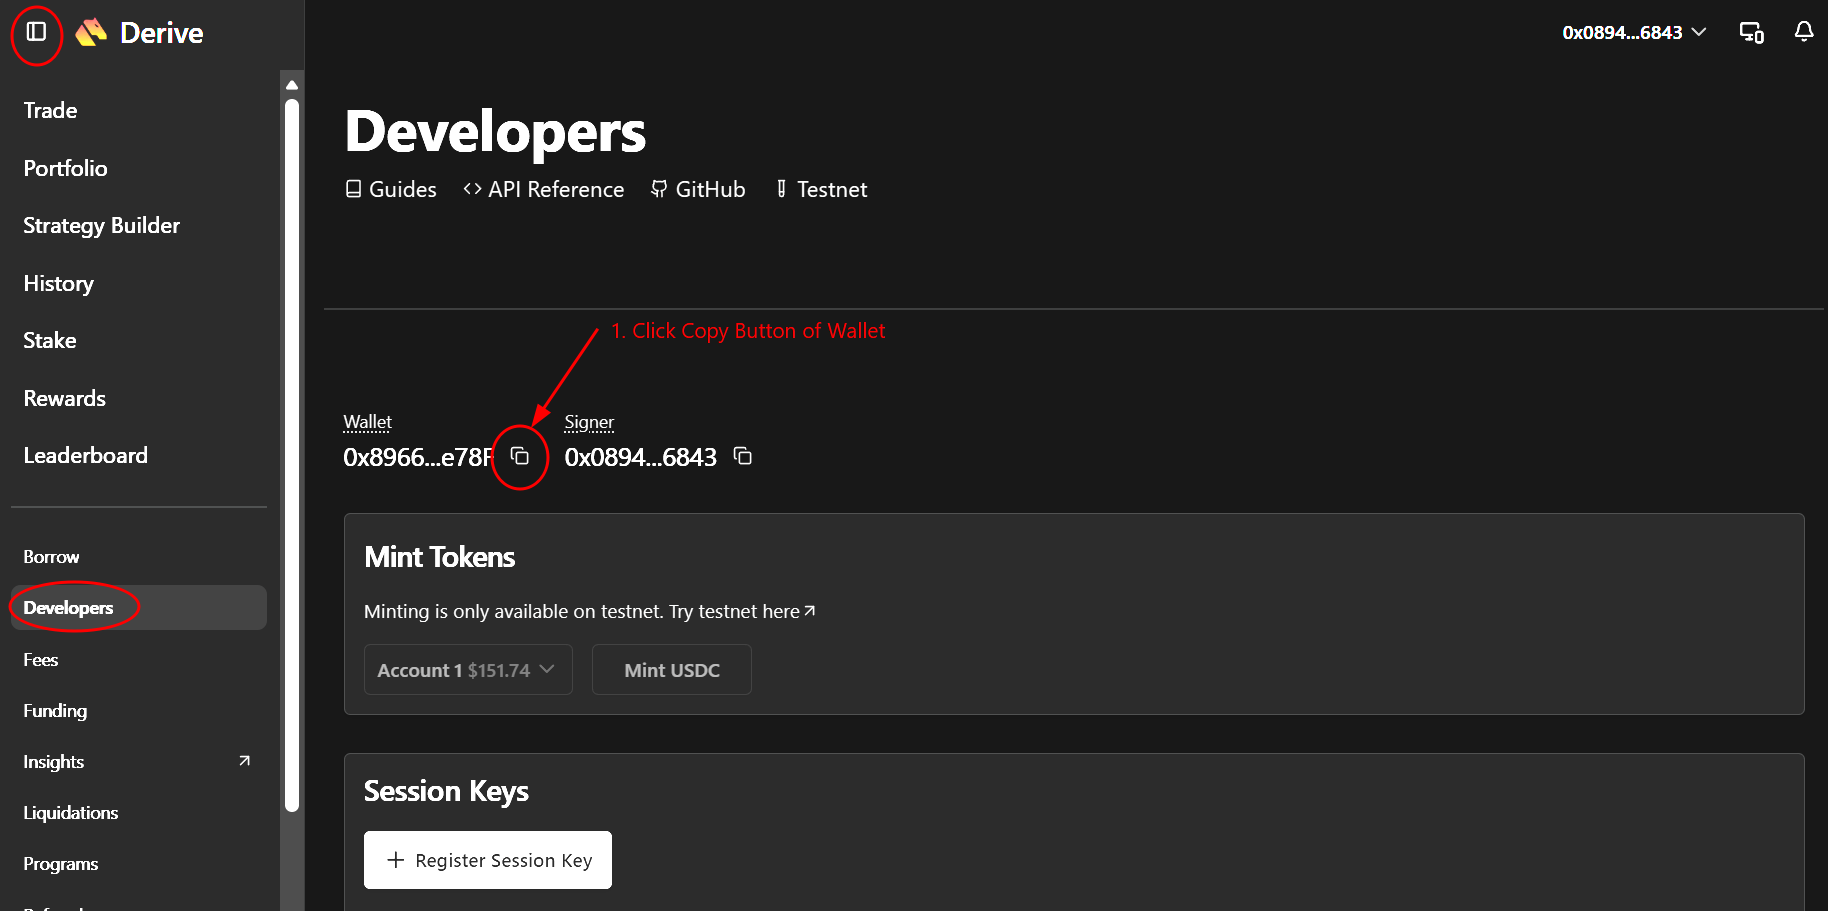
- At the top left, click the Hamburger icon to open the side bar, click Developers, then click Register Session Key
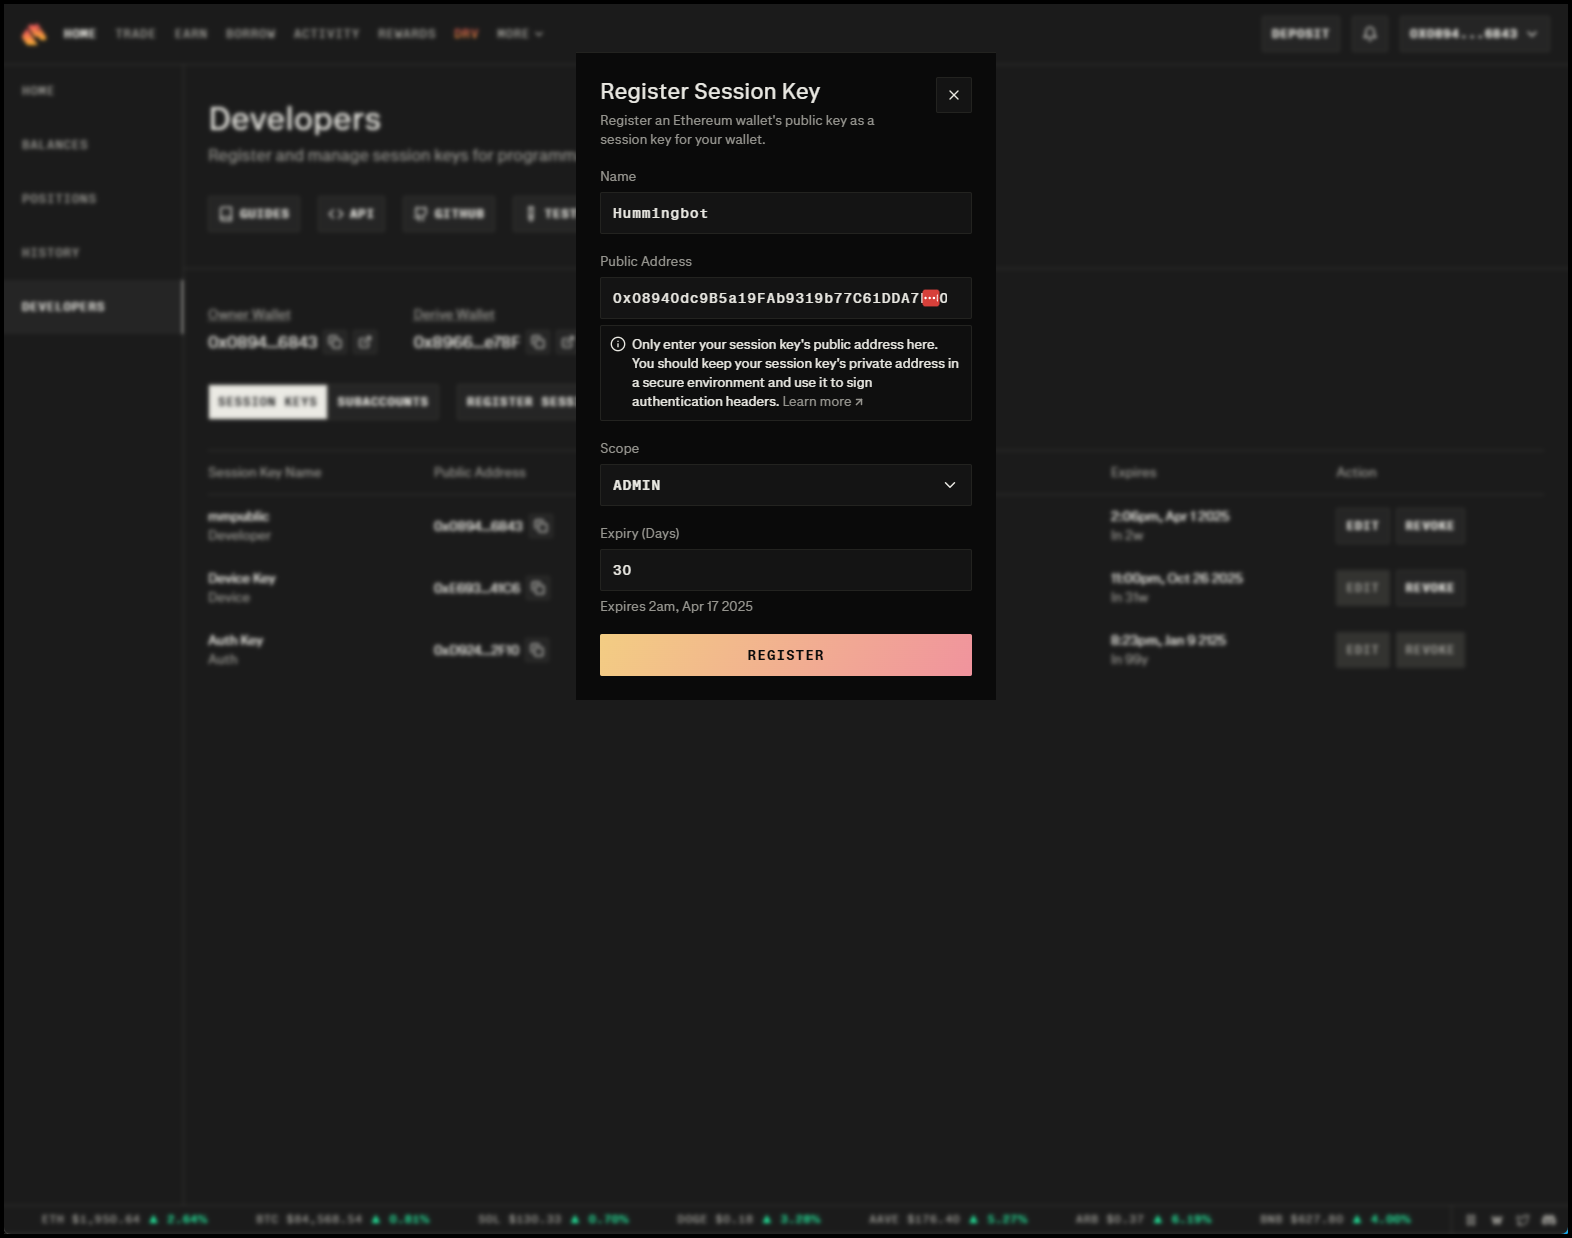
- Enter Name, click Generate, click the Copy icon of the private key, select Admin for Scope, then click Register
Important
Keep the private key safe and secure. Create a new session key if it is lost or compromised.
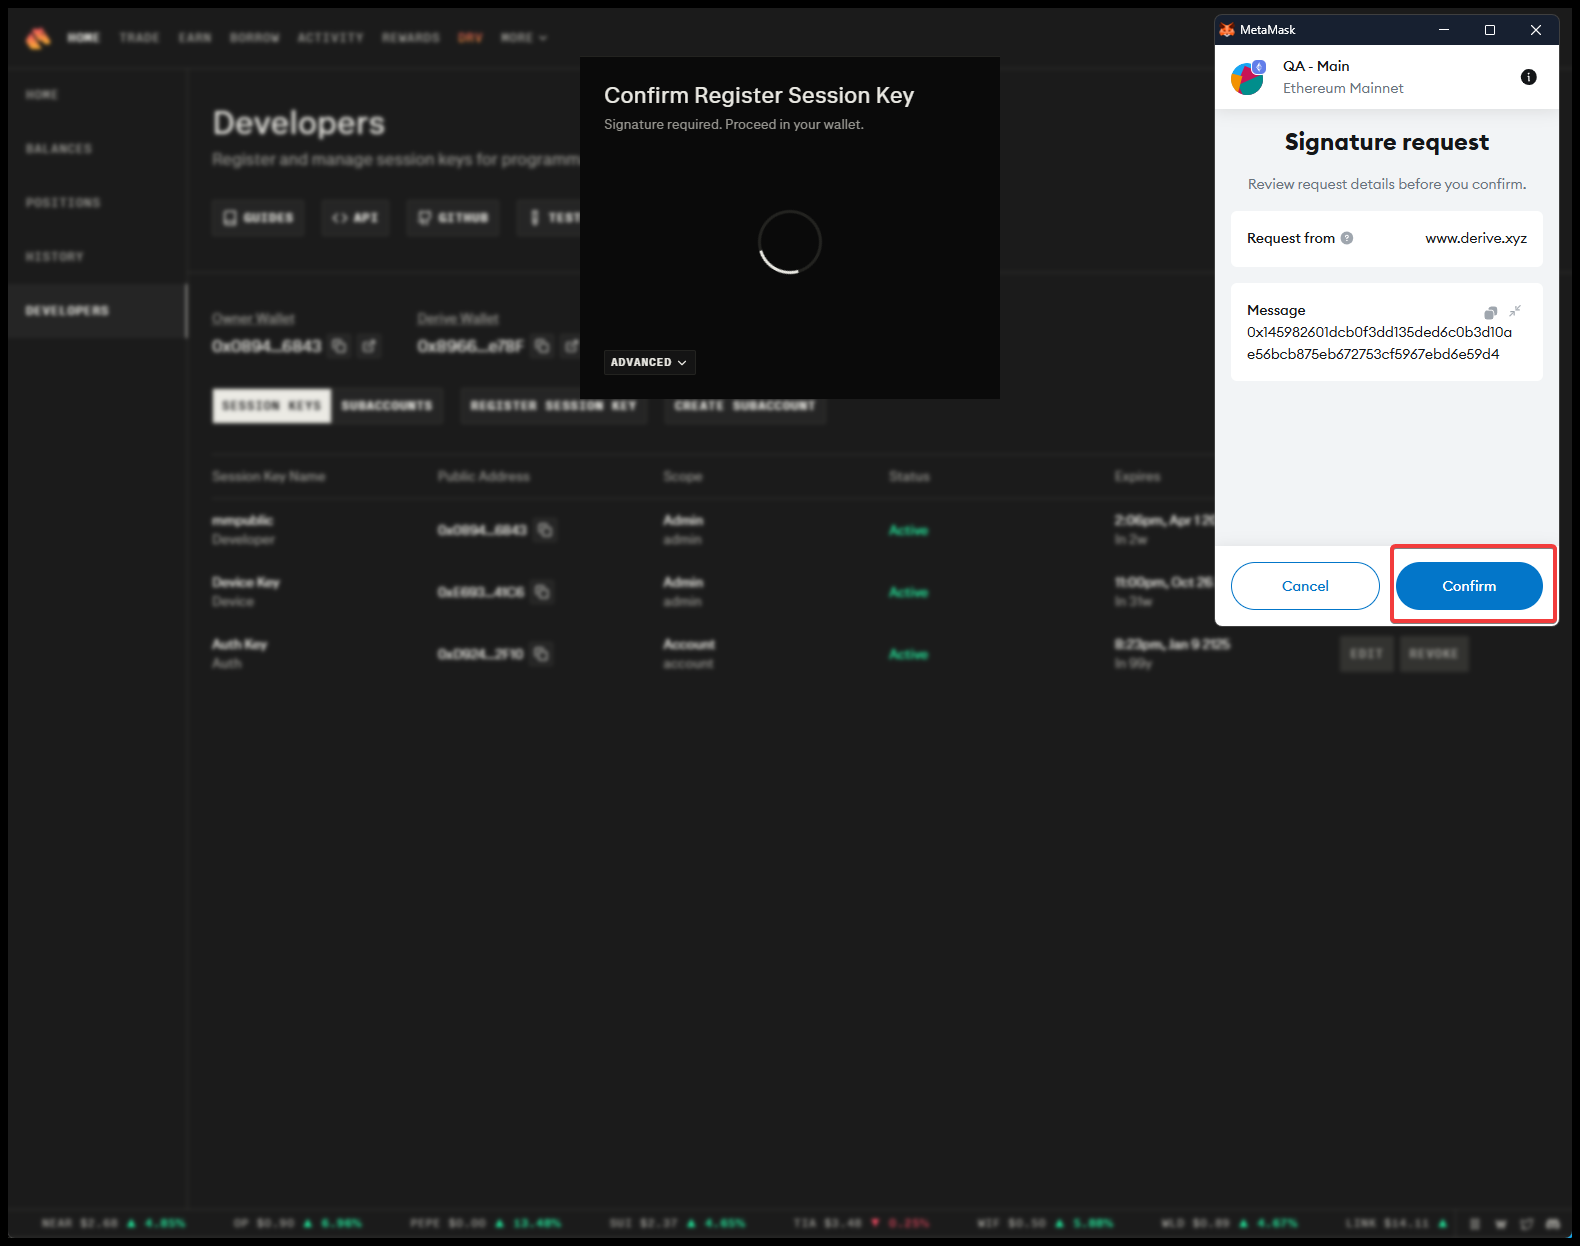
- Approve the registration in your wallet. Your wallet (for example, MetaMask) will show a signature request — click Confirm or Sign to finish registering the session key
Create New Subaccount
Recommended
Create a new subaccount so balances are fetched and displayed correctly for both spot and perpetual.
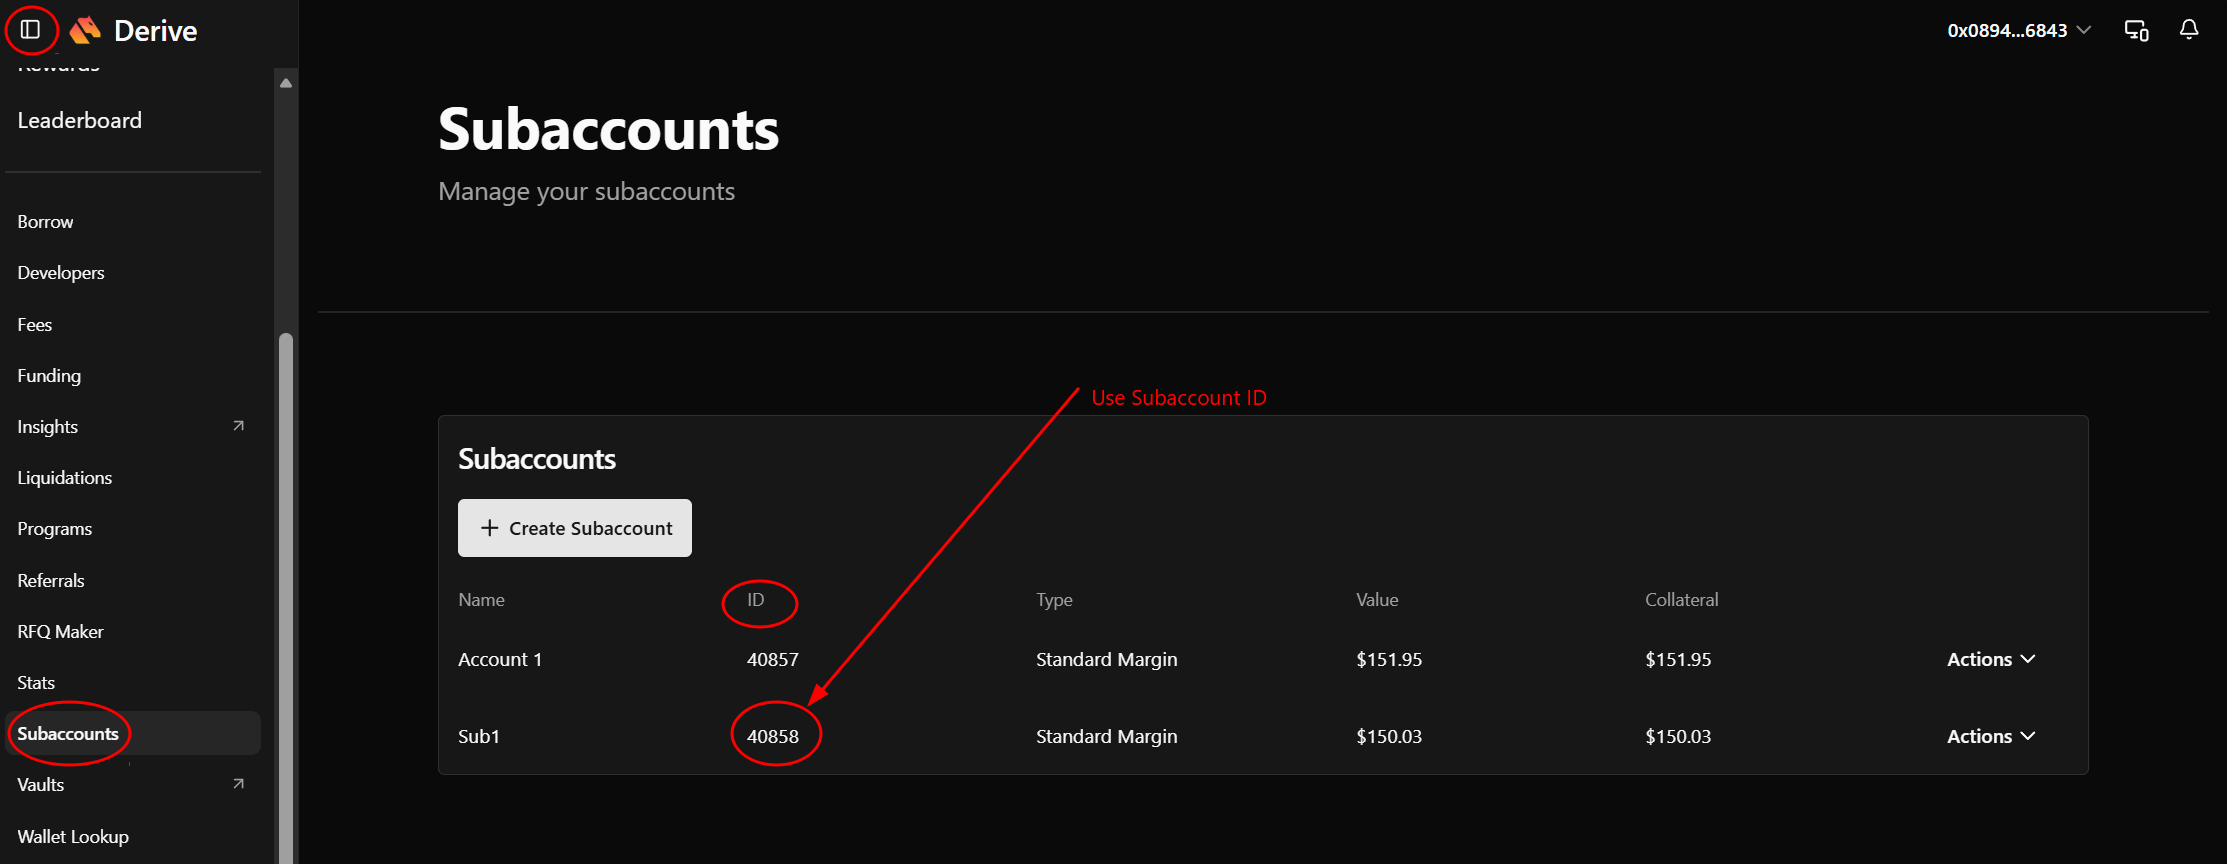
- In the side bar, click Subaccounts, then click Create Subaccount
- In the Create Subaccount form, enter a Name, select Standard Margin, then click Enable Trading
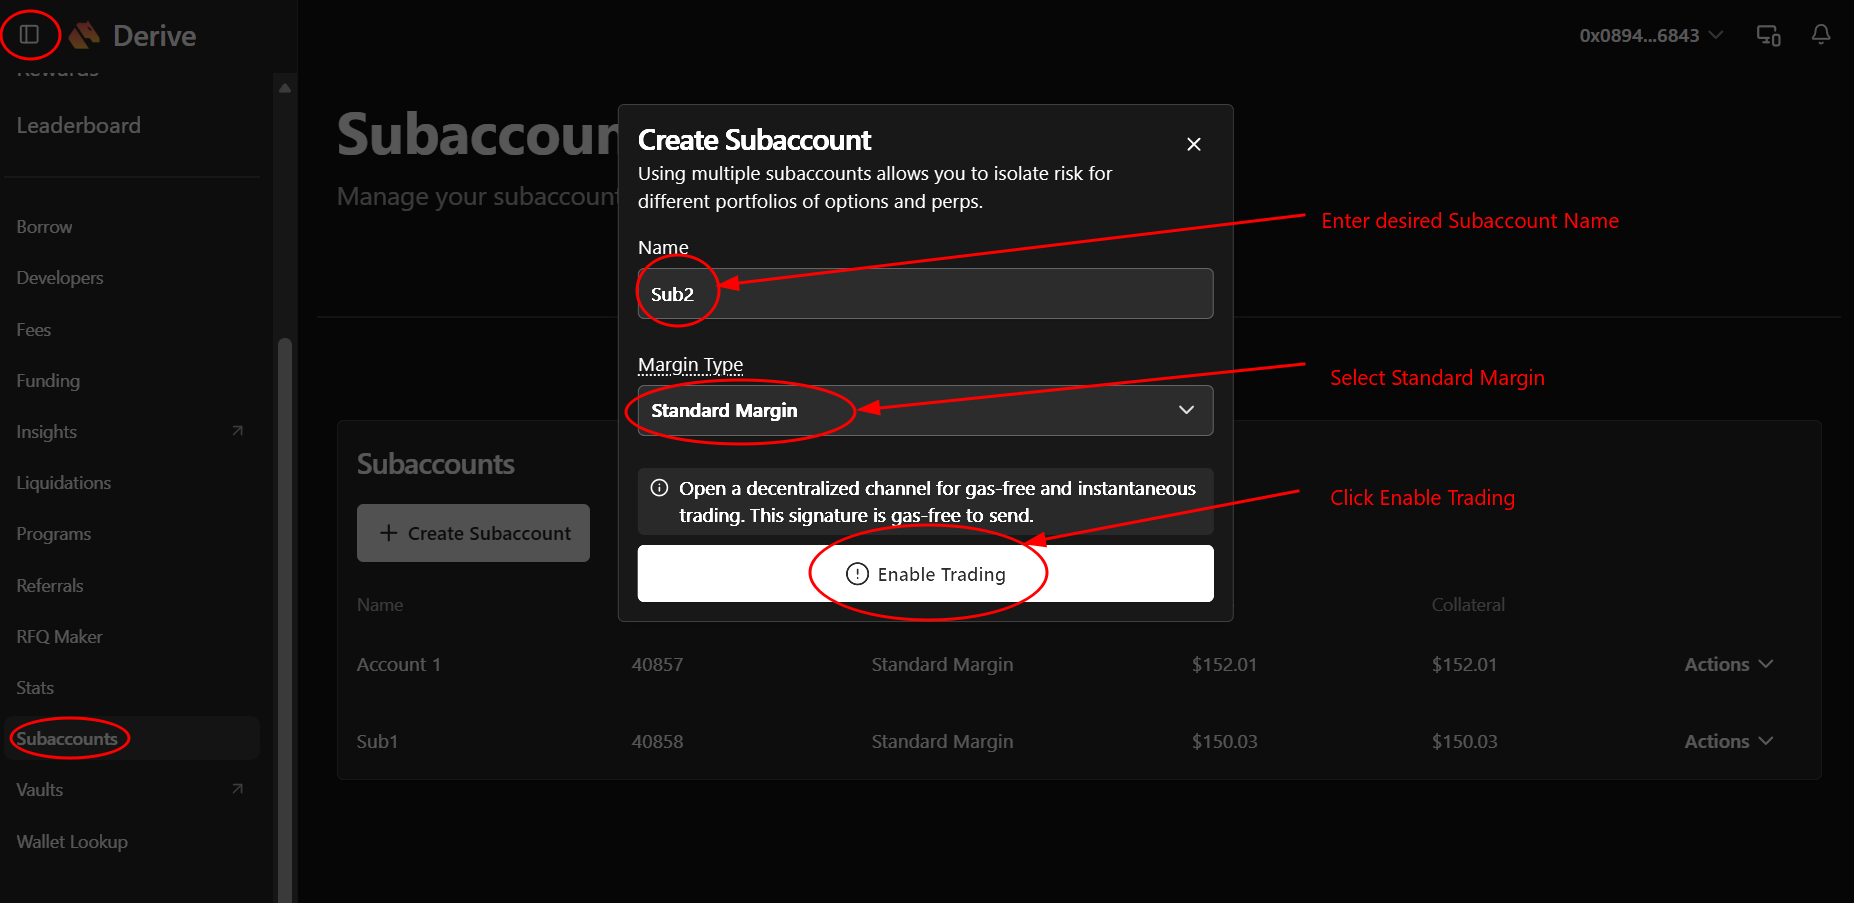
- Copy the ID of the newly created subaccount. You will paste this into Condor or the Hummingbot client.
You need four values from Derive: Wallet address, Session Key (private key), Subaccount ID, and Account Type.
Where to copy each value on Derive
- Wallet address: open the Hamburger menu → Developers → click the Copy icon next to Wallet (not Signer)
- Session Key: the private key you copied when registering the session key. It is shown only once.

- Subaccount ID: open the Hamburger menu → Subaccounts → copy the ID of the account you want to trade with
Account Type
Use one of the following values:
| Value | Meaning | Typical use |
|---|---|---|
| SM | Standard Margin | Spot and perpetual trading |
| PM2 | Portfolio Margin | Multiple options and perps |
Using Derive with Condor
You need four values from Derive: Wallet address, Session Key (private key), Subaccount ID, and Account Type.
-
Install Condor using Condor Quickstart
-
In the Telegram Condor bot, open the credentials dashboard:
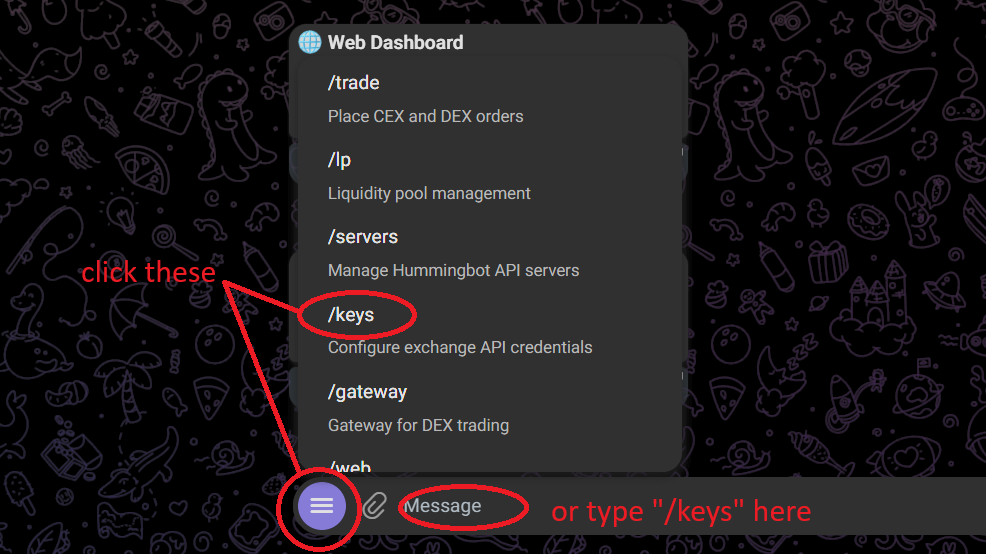
- Tap the menu button (bottom left), then tap
/keys, or - Type
/keysin the message field and press Enter - Click Open Dashboard
- Tap the menu button (bottom left), then tap
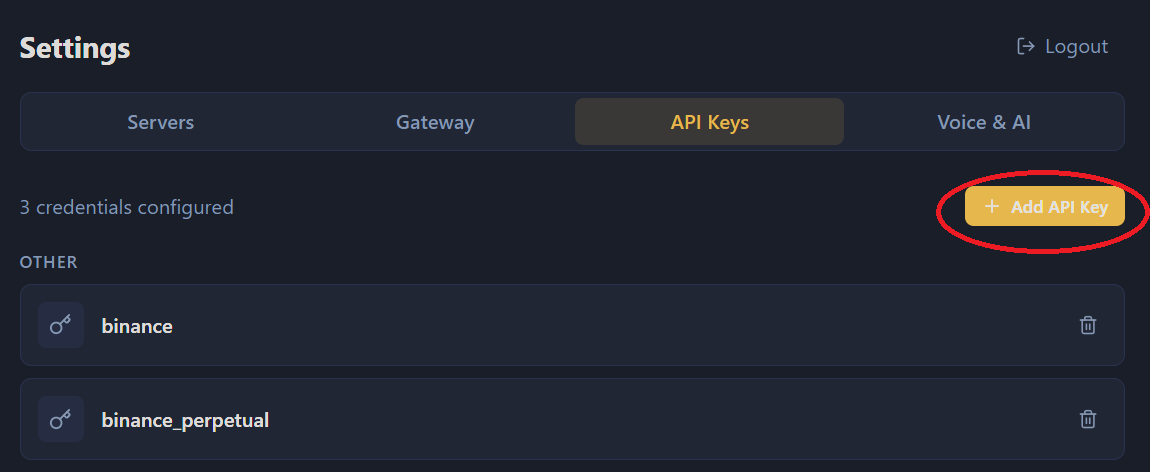
- In the dashboard, open the API Keys tab and click + Add API Key
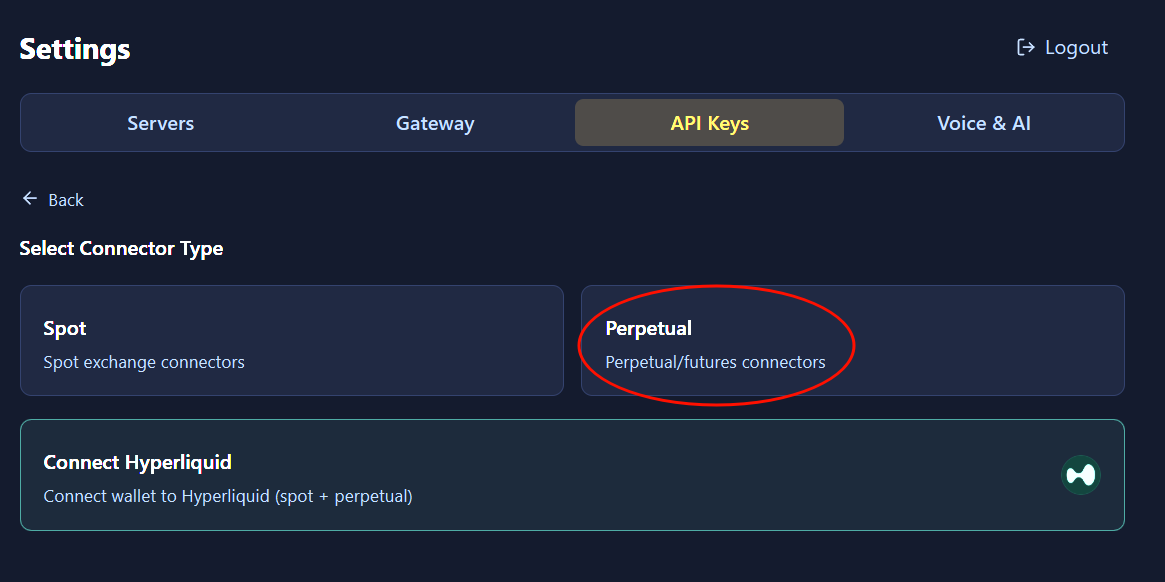
- Click Perpetual (use Spot instead if you are connecting the
derivespot connector)
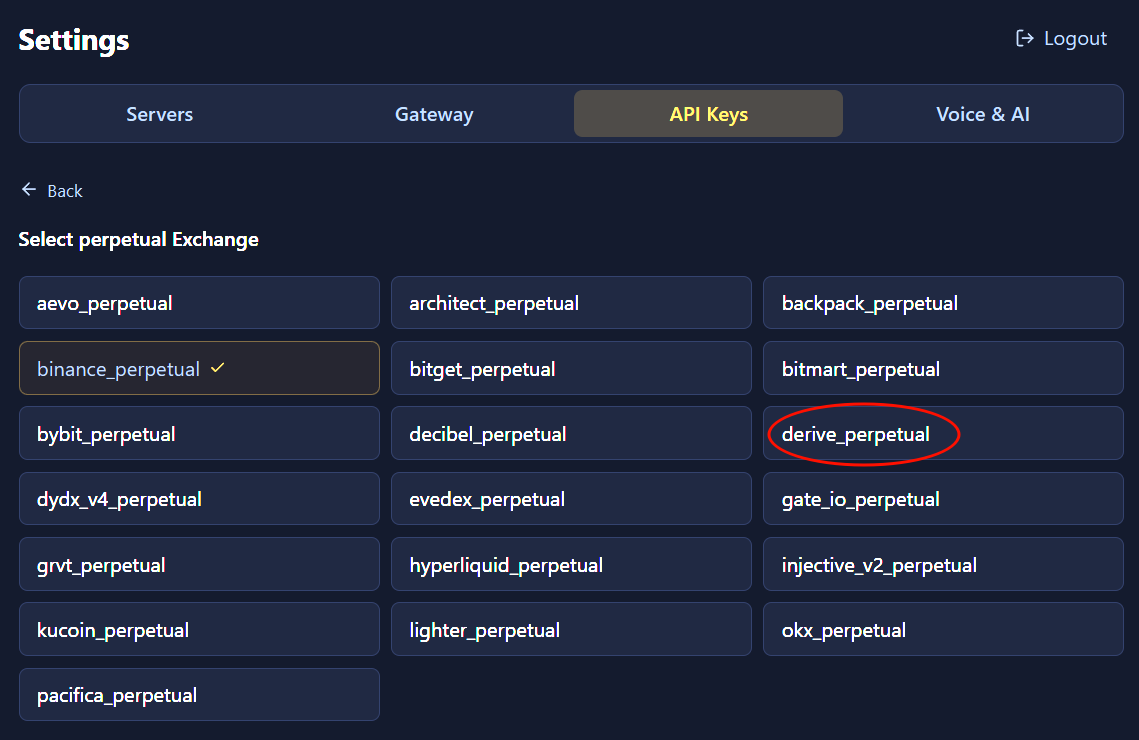
- Click derive_perpetual
-
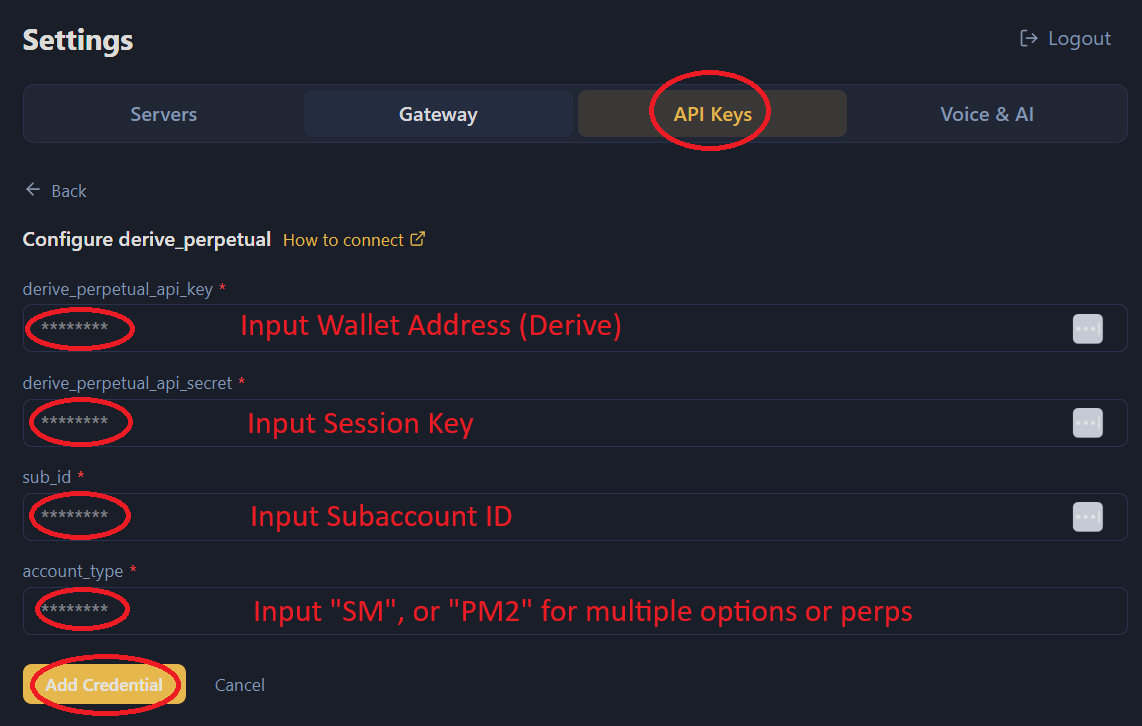
Fill in the form. The dashboard field names do not match Derive's labels — use this mapping:
Dashboard field Enter this derive_perpetual_api_key Derive Wallet address derive_perpetual_api_secret Session Key private key (copied when you registered the key) sub_id Subaccount ID account_type SM or PM2 Click Add Credential
Account Type
Use one of the following values:
| Value | Meaning | Typical use |
|---|---|---|
| SM | Standard Margin | Spot and perpetual trading |
| PM2 | Portfolio Margin | Multiple options and perps |
Using Derive with Hummingbot Client
The following instructions guide you through adding your Derive credentials to the standalone Hummingbot command-line client.
Docker Setup
Clone the Hummingbot Repository
Edit docker-compose.yml
Navigate to the hummingbot project directory and open the docker-compose.yml file using an IDE like VSCode or a text editor.
Update the Image Line
Find the line that starts with image: under the hummingbot service. Modify it based on whether you want the latest stable or development version:
For the latest stable version:
For the development version:
Launch the Docker Container
After updating the image line, clone the repository and launch the Hummingbot Docker container:
Attach to the Hummingbot Container
Hummingbot should now be running in the background. Use the following command to attach to the running instance:
Proceed to Add API Keys
Once Hummingbot is running, follow the steps in the "Add Keys to Hummingbot" section below to connect your Derive account.
Source Setup
Clone the Repository
Run Install
After cloning the repo, install the Hummingbot dependencies by running the install command:
Activate the Conda Environment and Compile
Activate the conda environment and compile Hummingbot:
Start Hummingbot
Run the following command to launch Hummingbot:
Add Keys to Hummingbot
To connect Hummingbot to Derive, you'll need the same four values:
- Derive Wallet address — copy Wallet on the Developers page, not Signer
- Session Key private key — the key shown once when you registered it, not your MetaMask / owner key
- Subaccount ID — prefer a funded subaccount
- Account Type:
SMorPM2
From inside the Hummingbot client, run connect derive_perpetual for perpetual markets, or connect derive for spot:
>>> connect derive_perpetual

Enter Your DerivePerpetual Wallet address >>>
Enter your session private key >>>
Enter your Subaccount ID >>>
Enter your Derive Account Type (SM/PM2) >>>
Account Type
Use one of the following values:
| Value | Meaning | Typical use |
|---|---|---|
| SM | Standard Margin | Spot and perpetual trading |
| PM2 | Portfolio Margin | Multiple options and perps |
If the credentials are correct, you'll see:
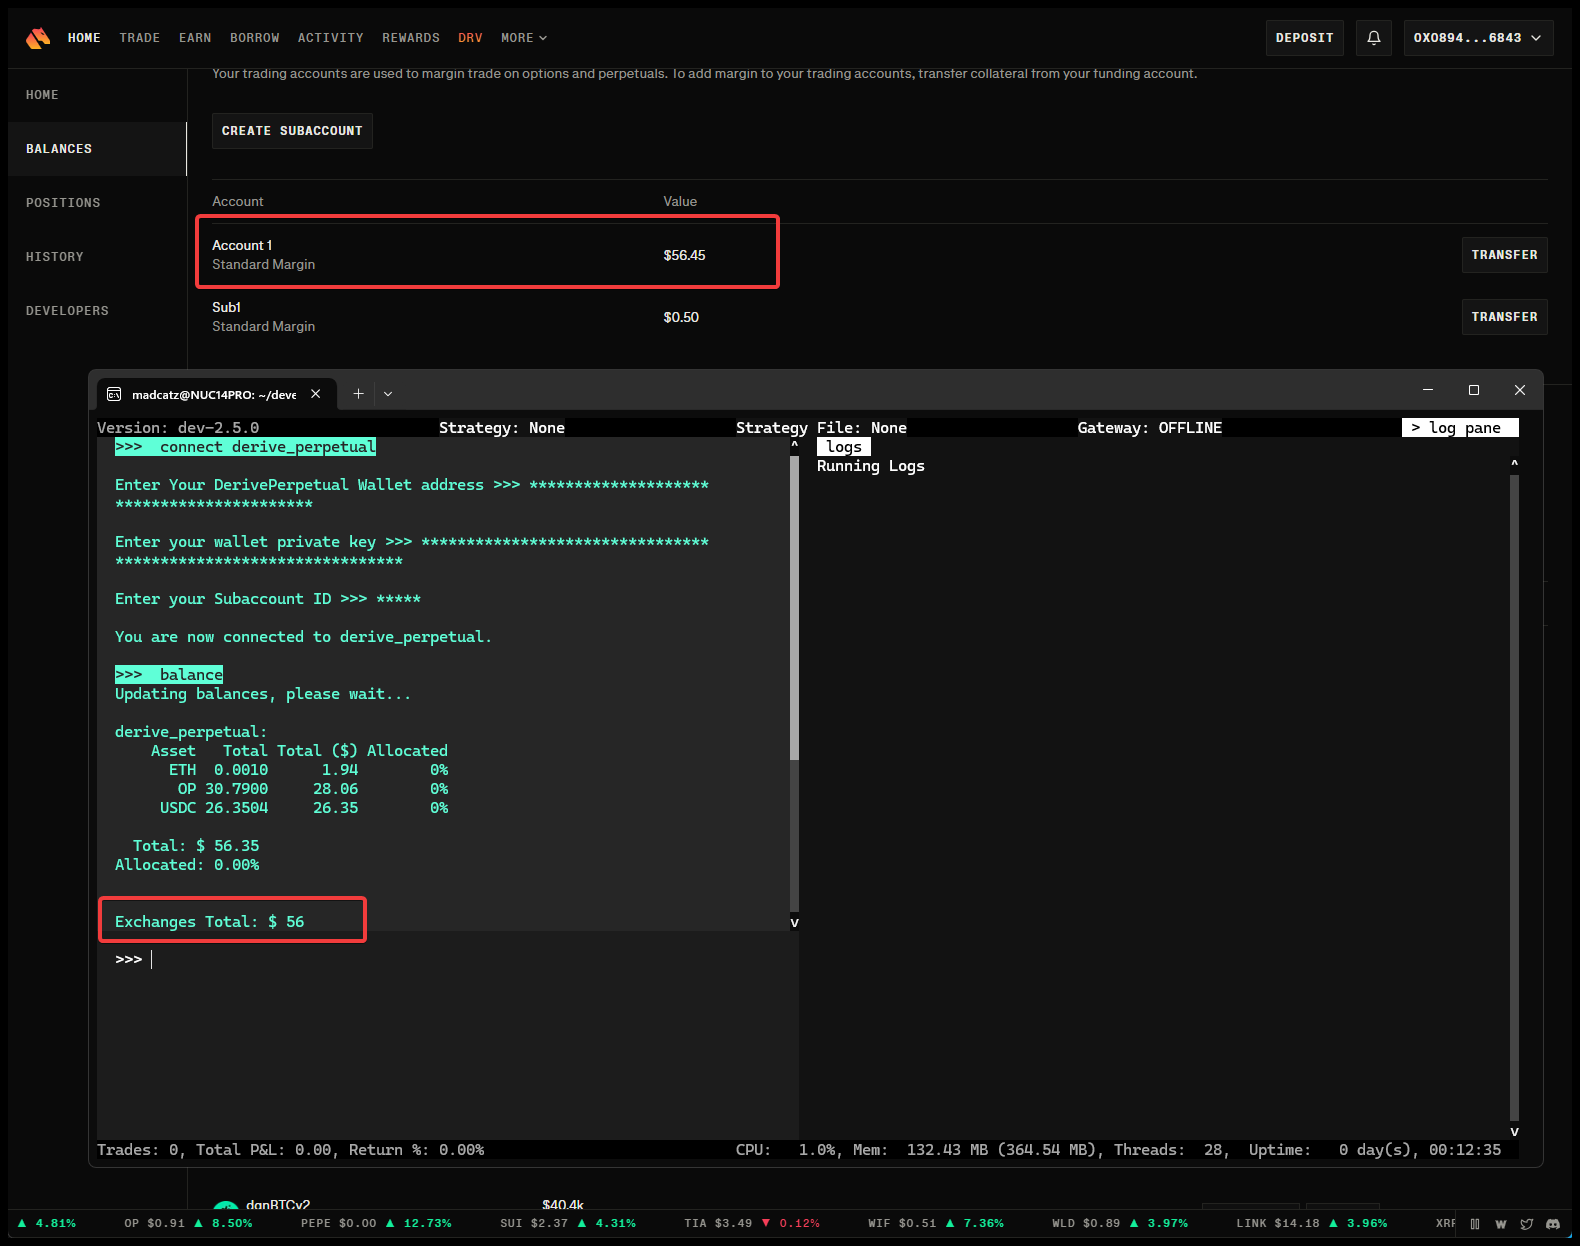
To verify the connection, run balance and check that it matches your Derive account:
Run a Strategy
For this example, we'll use the bollinger_v1 directional trading controller.
Create a controller config
Run the create command from within the Hummingbot client to configure the controller:
Create the configuration:
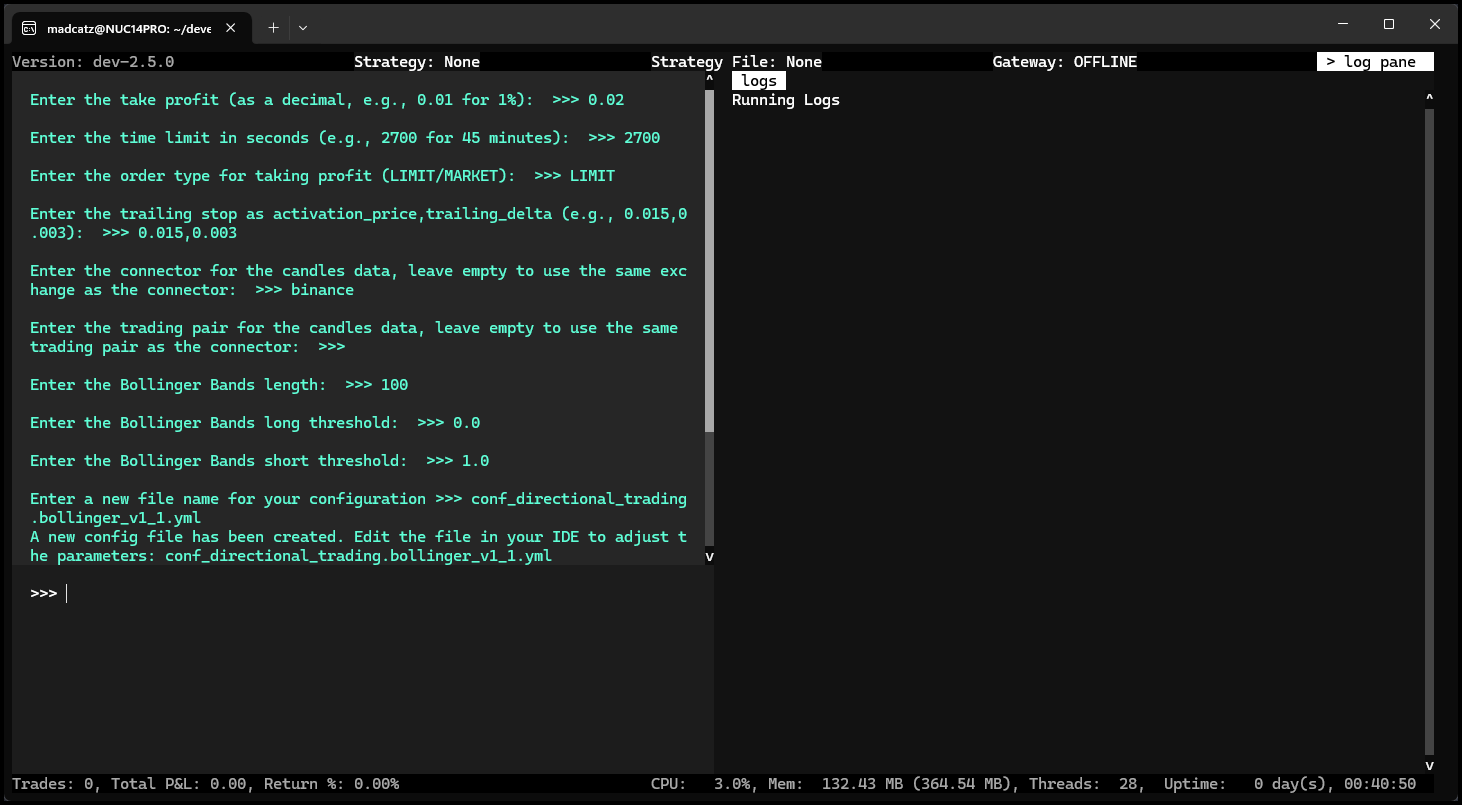
You will be prompted to provide various configuration parameters. Feel free to adjust the settings based on your preferences:
- Select derive_perpetual as the name of the exchange you want to trade on.
Enter the total amount in quote asset to use for trading >>>
Enter the name of the exchange to trade on >>> derive_perpetual
Enter the trading pair to trade on >>>
Enter the maximum number of executors per side >>>
Set the leverage to use for trading >>>
Enter the stop loss >>>
Enter the take profit >>>
Enter the time limit in seconds >>>
Enter the order type for taking profit >>>
Enter the trailing stop as activation_price, trailing delta >>>
- When prompted for the connector with the candles data, make sure to select a different connector other than derive since it doesn't currently support candles feed.
Enter the connector for the candles data, leave empty to use the same exchange as the connector:
Enter the trading pair for the candles data, leave empty to use the same trading pair as the connector:

- Once the configuration is done, give the controller config a name or use the default one:
Create a script config
-
Next we have to create the script config for the v2_with_controllers generic script to run our controller config.
-
To create the script config, use the following command:
- Make sure to enter the file name of the controller config we created earlier
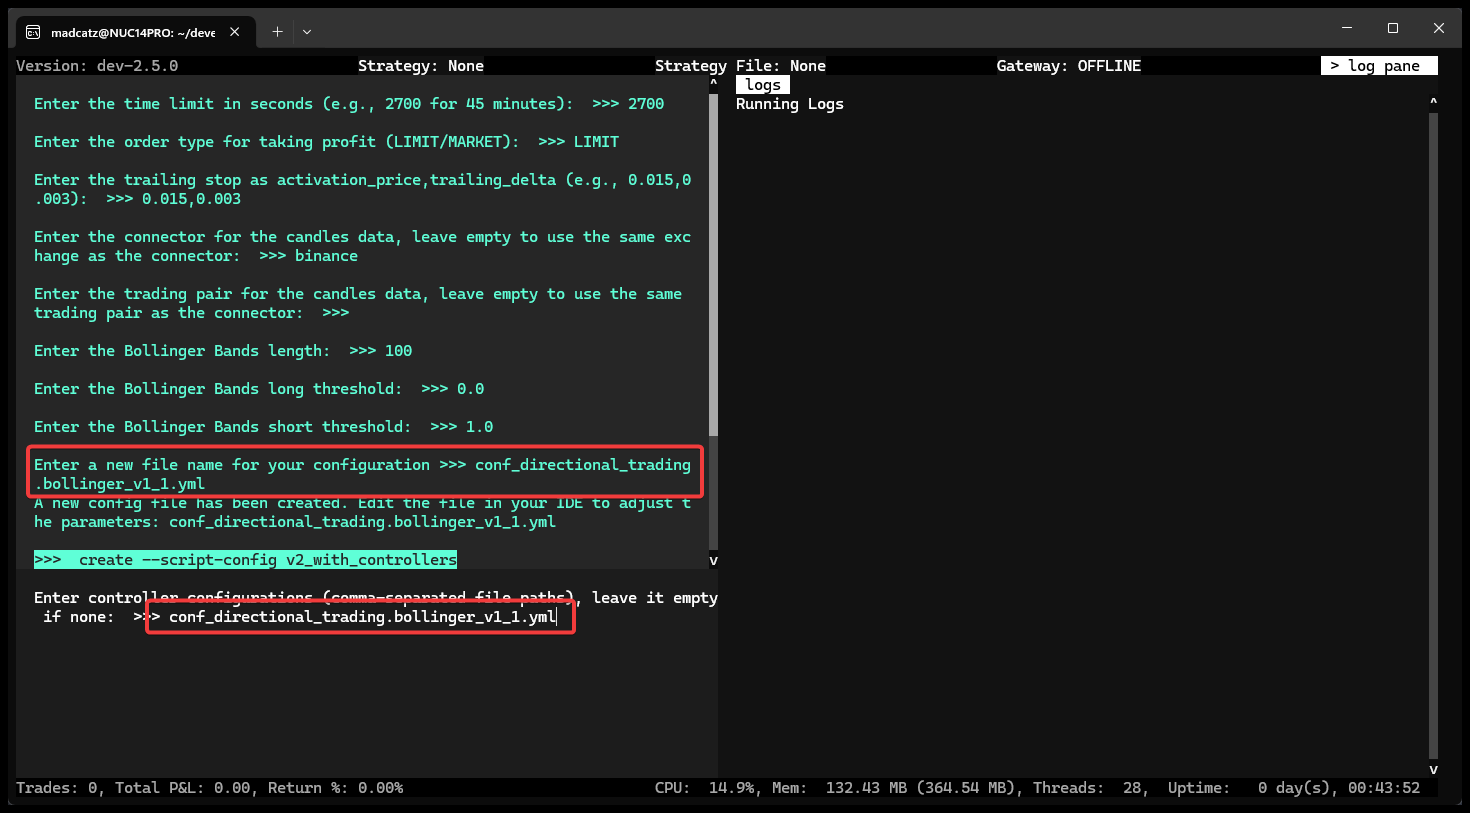
- Lastly, give the script config a name

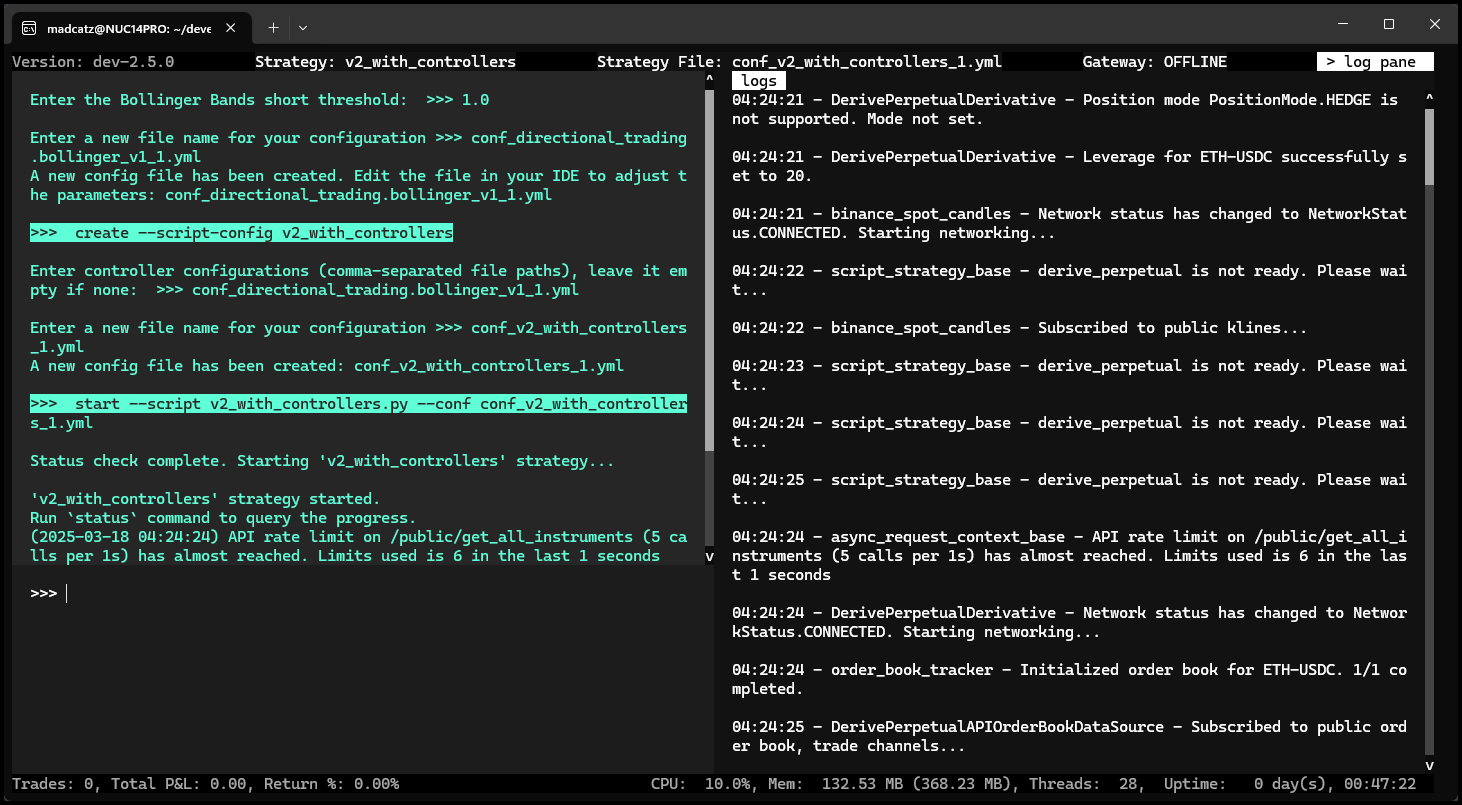
Start the strategy
To start the strategy, use the following command. Note - if your config file has a different file name then replace the config name below
Monitor the Strategy
You can monitor your bot by checking the logs for any errors and running the status command to view the current order status. If needed, you can close the log pane to get a clearer view of the status.
This strategy is designed to place a buy order when the price approaches the lower Bollinger Band (indicating an oversold condition) and a sell order when the price reaches the upper Bollinger Band (indicating an overbought condition). Since the bot waits for favorable conditions before executing trades, you may need to allow some time before it places its first order.

Stop the Bot
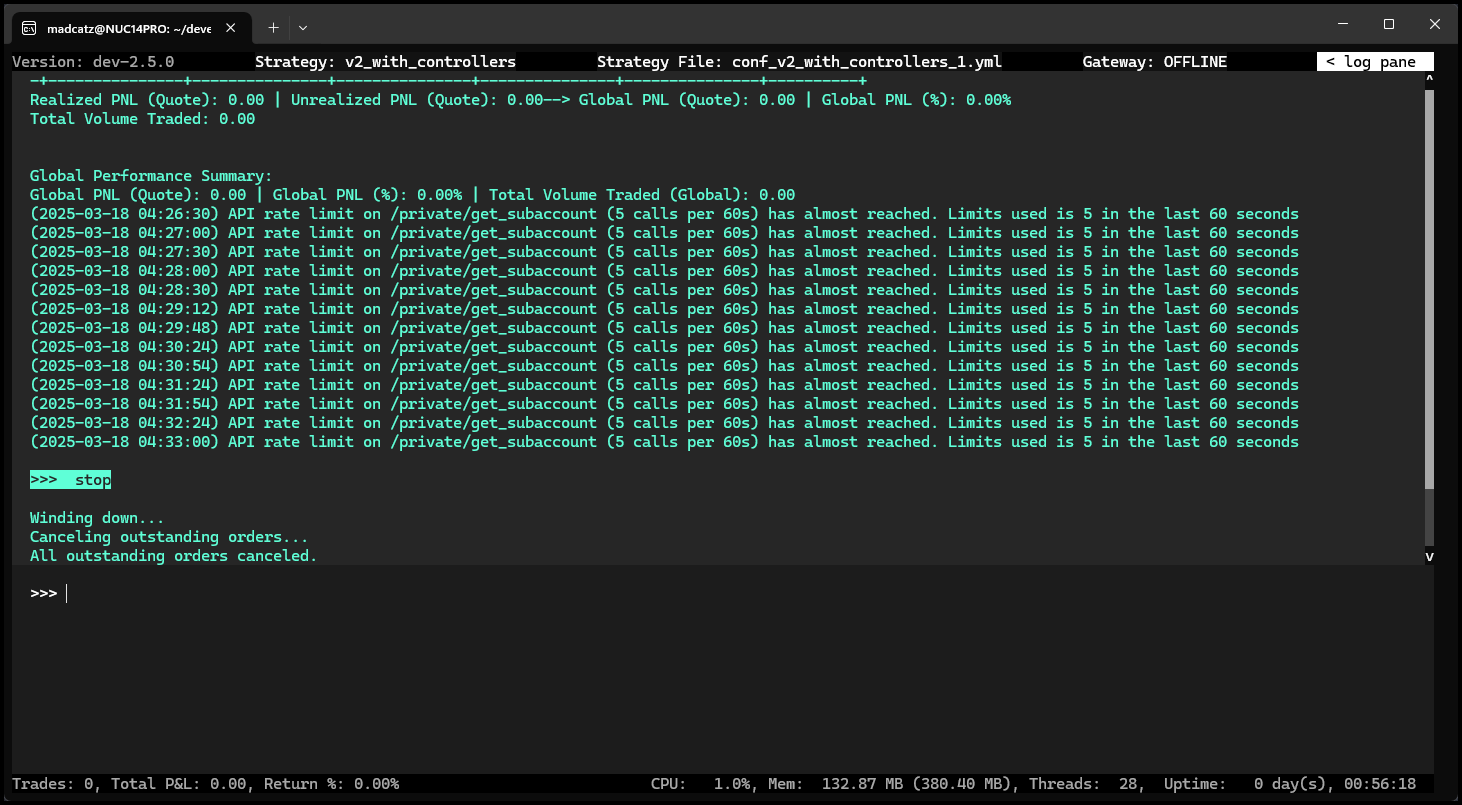
To stop the bot, use the stop command. Please note that the bot will need some time to create orders to close out the positions.
For more details on V2 Strategies or other available controllers, check out the Controllers section of V2 Strategies documentation. Please note that since Derive only supports one-way mode some V2 Strategies that use Hedge mode may not work correctly with the controller.
Known Issues
- Derive Rate Limit - The system enforces rate limits using a fixed window algorithm, replenishing the request allowance every 5 seconds to maintain system stability. Market makers can access higher rate limits upon request by contacting the support team.
Additional Information: Leverage
When using perpetual futures exchanges, leverage refers to the size of your position relative to the collateral you have provided. Specifically, it's calculated as:
For detailed information on how leverage is computed on Derive, see their official documentation on Leverage.